Step by Step Aquaponics
By Shudra Way
My first introduction to aquaponics was during my suburbia days, through a neighbour who had a 5000 litre aquaponics tub containing hundreds of rainbow trout being grown for eventual sale. Water was pumped out of the tub and through a series of aquaponics grow beds containing various salad vegetables, and back into the tub. It was a very impressive and very expensive off-the-shelf system that he’d invested in as a possible money making venture. My impression was of aquaponics being akin to setting up a small business in terms of capital and complexity. That idea was left to sit in the recesses of my subconscious until it was next required.
This would be several years later, after I’d sold up in suburbia and had begun homesteading on ten forested acres. I’d badly broken my leg from a fall while building my house, and was now resigned to spending the majority of my convalescence prone in front of the television. This was a new experience for me, as I was normally too busy working on building my house to have any time for luxuries like this. The surgeon had been very frank about the unlikelihood of returning to my old job, so my time was being spent browsing YouTube for income producing possibilities.
I once again discovered aquaponics, but from very different angles. I found the usual large-scale aquaponics, but also very cheap and simple systems made from everyday household items. And they weren’t for the purpose of raising hundreds of fish to be sold for eventual sale. They were primarily to grow salad greens.
Remember This Bit for Later
Once I was up and moving around in a cam boot and legally allowed to drive again, I set forth to purchase an aquaponics system that I’d formed in my head. It consisted of a 600 litre (130 gallon) tub with two 60 litre (13 gallon) tubs sitting on top. For some reason, I never took any photos of this setup. Six goldfish went in the 600 litre tub, and the two 60 litre tubs were filled with expanded clay balls, and planted with salad greens. Following YouTube Instructions, I built bell siphons for each tub to create the ebb and flow effect. I’m not going to discuss bell siphons. They are old technology, and prone to failure. You will never need to know about a bell siphon.
The salad greens were insipid. Within a month, I found the first goldfish floating on the top of the water. I had no idea why. Maybe it was just genetically inferior. A few weeks later the remaining five fish were sitting at the bottom of the tub, not moving, and bright red. Googling revealed that they were suffering from ammonia poisoning due to the tub being vastly too small.
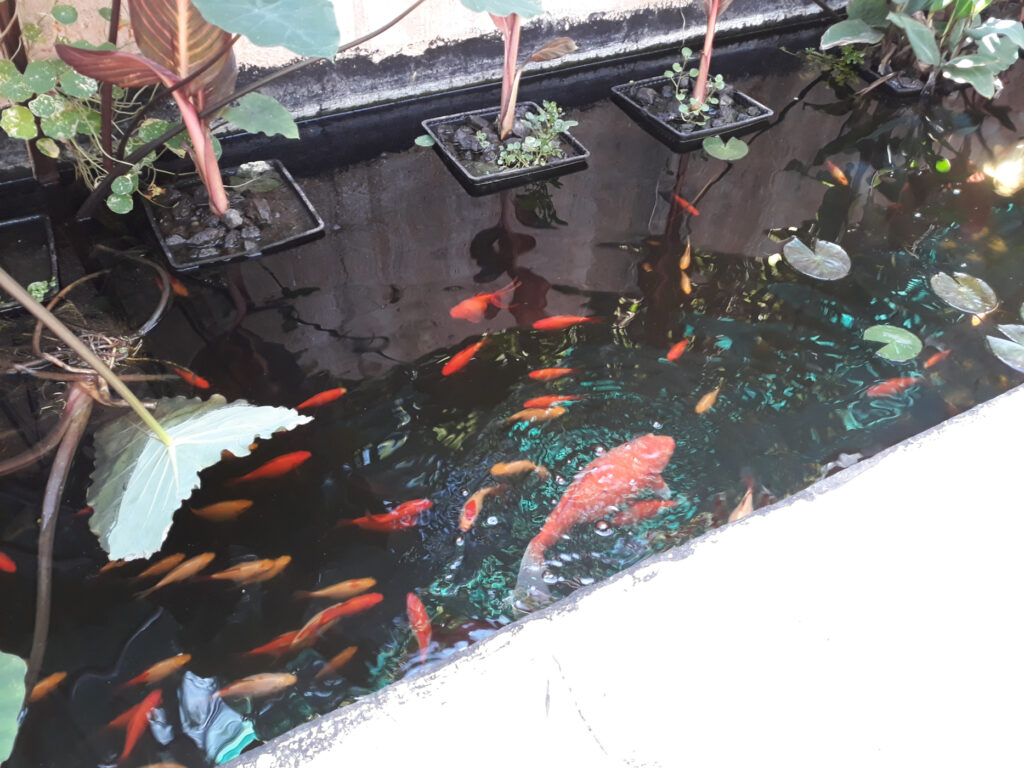
Along two sides of my nursery were two 6000 litre (1300 gallon) masonry greywater ponds that were required for my under-construction off-grid home to not require a septic. They were going to be the new fish ponds until the house was finished and they needed to become greywater ponds. Over the course of the next week, I sealed one of the ponds with food-grade pitch, filled it with water, and transferred the fish in. Three died, two survived. I then set about planting out the pond with water lilies, and restocked with more goldfish and koi.
The next two years were spent experimenting with various different kinds of grow beds, confident that the water plants and sheer volume of water would ensure the fish would never again suffer ammonia poisoning if the grow beds failed, or even if I didn’t even use grow beds for months at a time.

Chestnuts, hazelnut, elderberry, comfrey crowns and cuttings – all adapted to the Midwest.
The World’s Greatest Ebb and Flow Bed
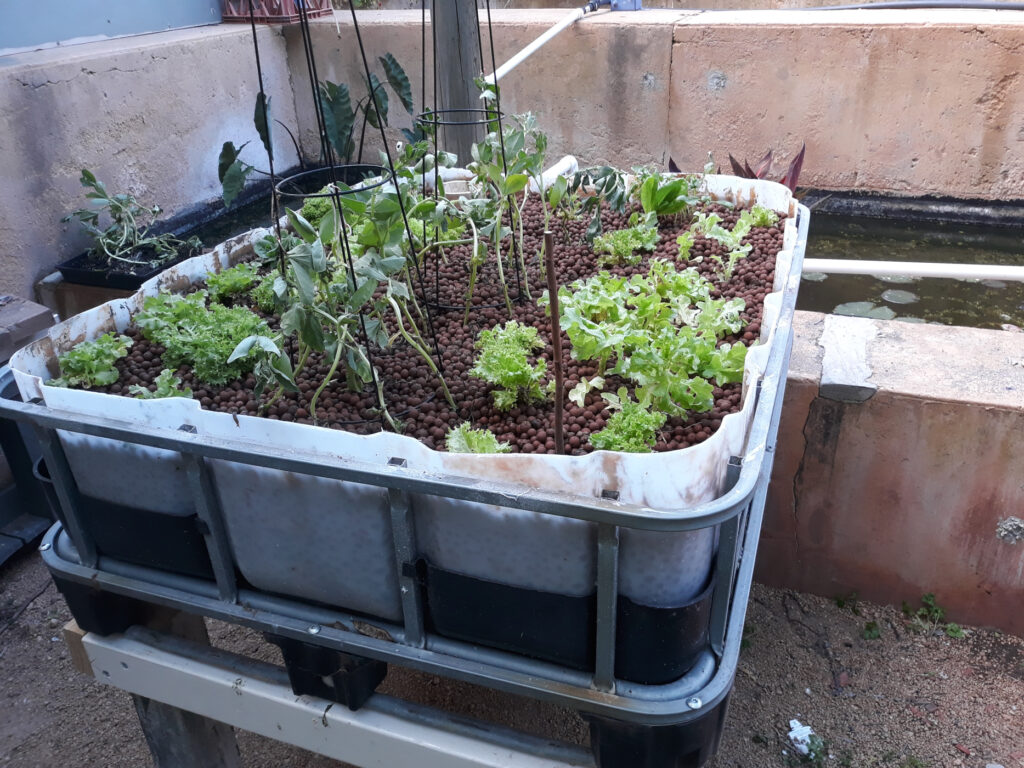
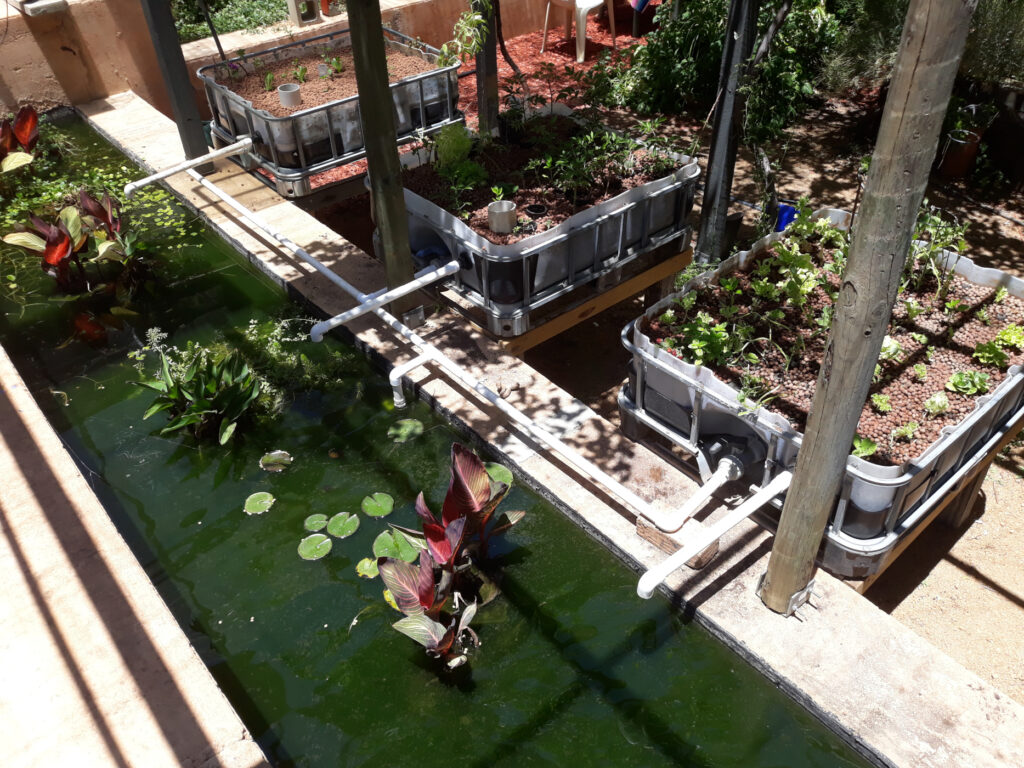
The following is the culmination of all the designs I’ve either used or seen used. It works, and has the least points of failure. The best part is that it’s modular enough to begin with the most basic setup you can afford, and the scale to the limits of your imagination. You get to immediately benefit from all my successes and failures.
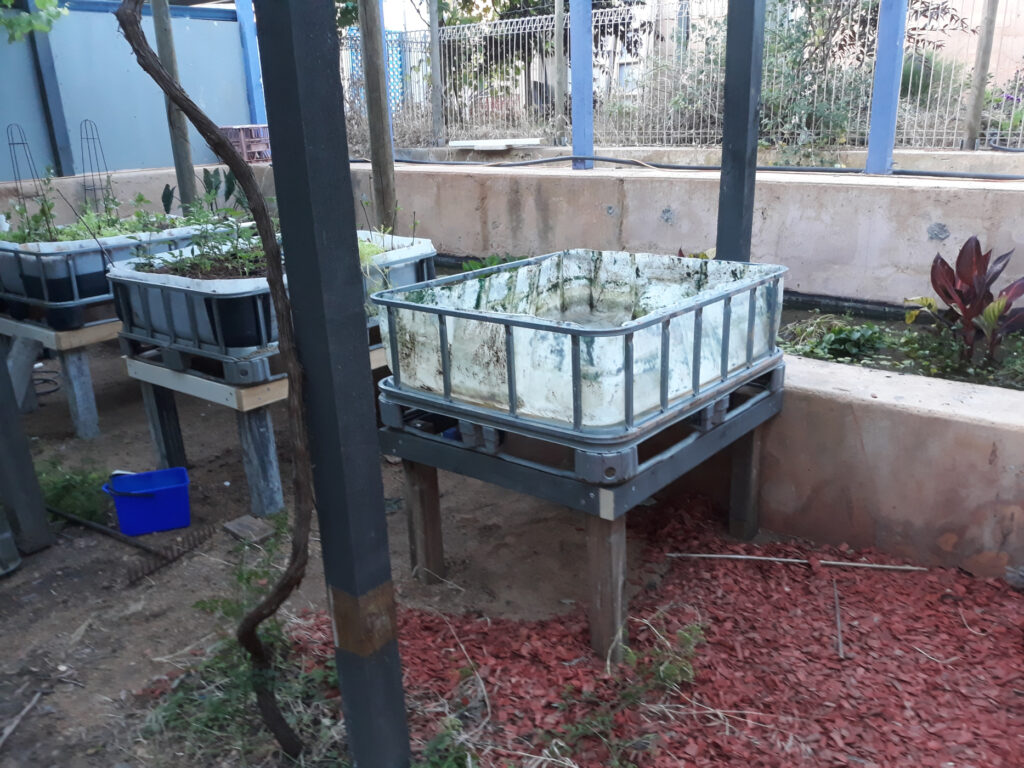
The World’s Greatest Ebb and Flow Bed is based on a standard IBC tote, the homesteader’s best friend. These can be found everywhere on any self-respecting homestead
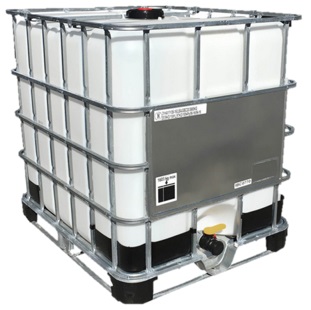
IBC Tote – the Homesteader’s Best Friend
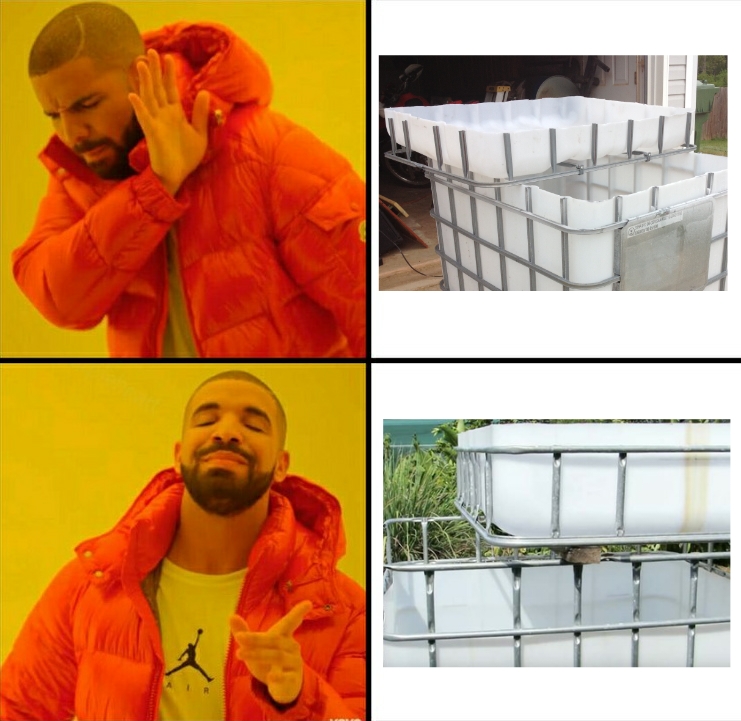
The first thing you want to do is disassemble the cage from the base. The reason for this is because we want the top of the cage, not the bottom. If you look carefully at the IBC Tote pic, you’ll notice that the horizontal bars of the cage aren’t evenly spaced. They’re closer together at the bottom, and become further apart towards the top. This is because the outward forces from the water in the bladder are greater at the bottom than at the top. We want to cut the cage so that it’s approximately 12 inches (30 centimetres) high, the ideal height for an ebb and flow bed. If you do this at the bottom of the cage, you’ll end up cutting between the horizontal bars. Not only does that look terrible, it doesn’t support the plastic bladder anywhere near as well as a horizontal bar will. The distance between the top 2 horizontal bars is normally close enough to inches as makes no difference. In this picture, Drake demonstrates the difference between a well-cut cage, and a poorly cut cage.
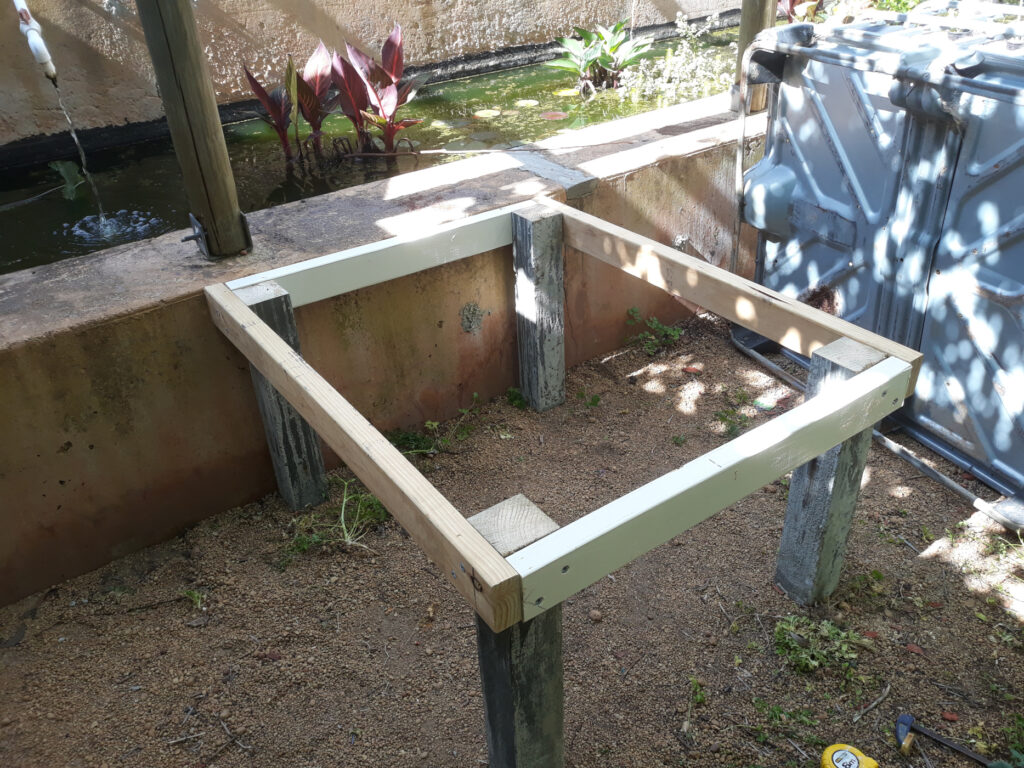
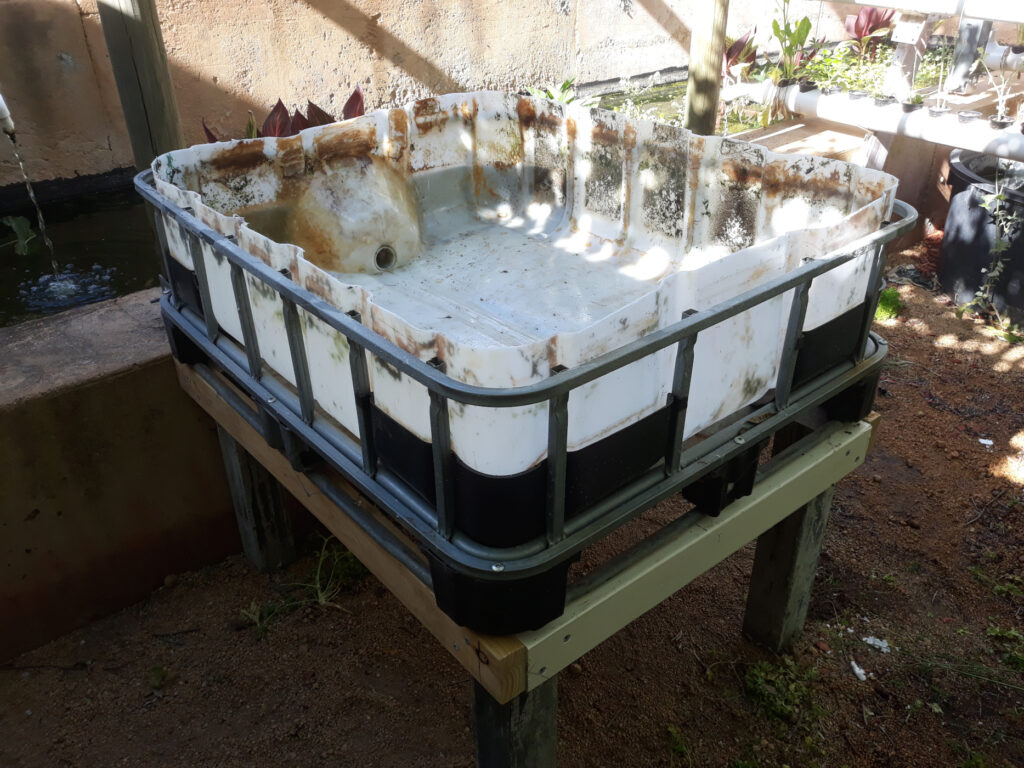
As seen above, we have our re-sized cage back on its base, sitting on a scrap wood stand. I’m not even going to go into details about a scrap wood base. This is something a homesteader takes in their stride. Mine is 2x4s for the IBC base to sit on, and 4x4s as legs. The height of the legs strikes a balance between the lip of your pond, and a comfortable height for you to work with the plants. If your pond is low or at ground level, you need only concern yourself with the ideal working height.
The majority of IBC taps have an annoyingly unique thread. Luckily the market will always provide, and there are a plethora of adapters available. IBC to 2″ gives a high-flow connection to gasoline powered water pumps. I have three of these set up for irrigating my gardens. For the purpose of our ebb and flow bed, we will be using an IBC to 1″ adapter, as seen below.
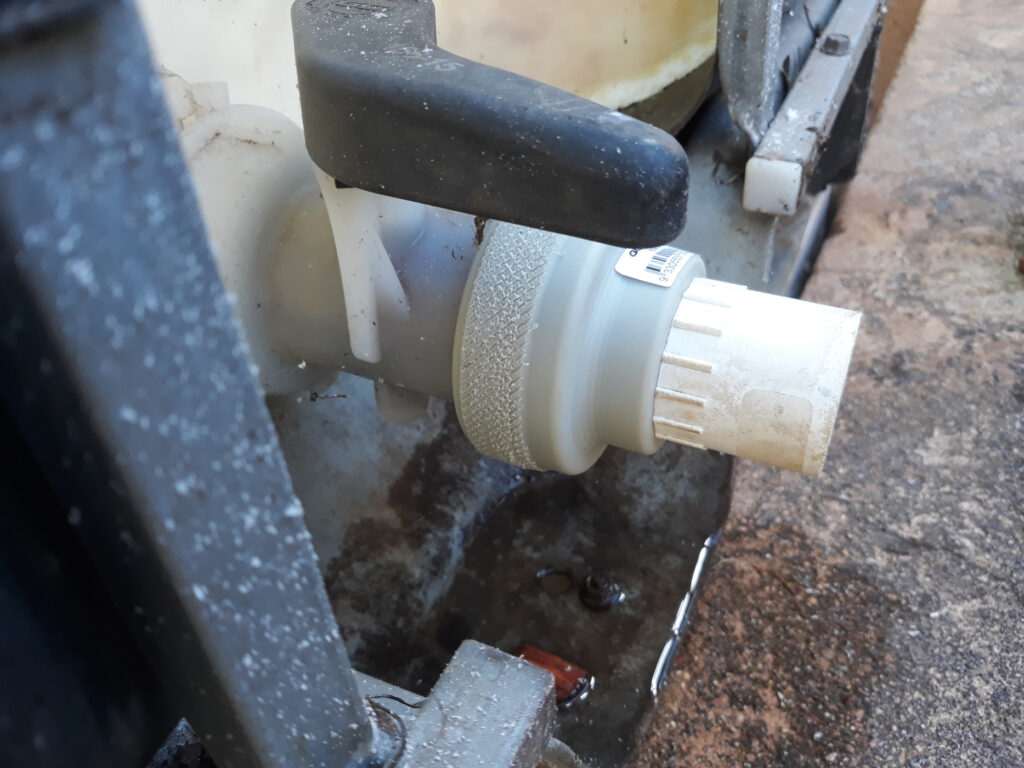
I have also noticed an increase in IBCs with metric 50mm threads, particularly from the Mauser Company. This is something to keep an eye out for, because 50mm to 25mm adapters are significantly cheaper than IBC to 1″ adapters.
Let’s Talk about Fittings
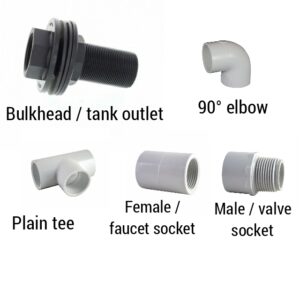
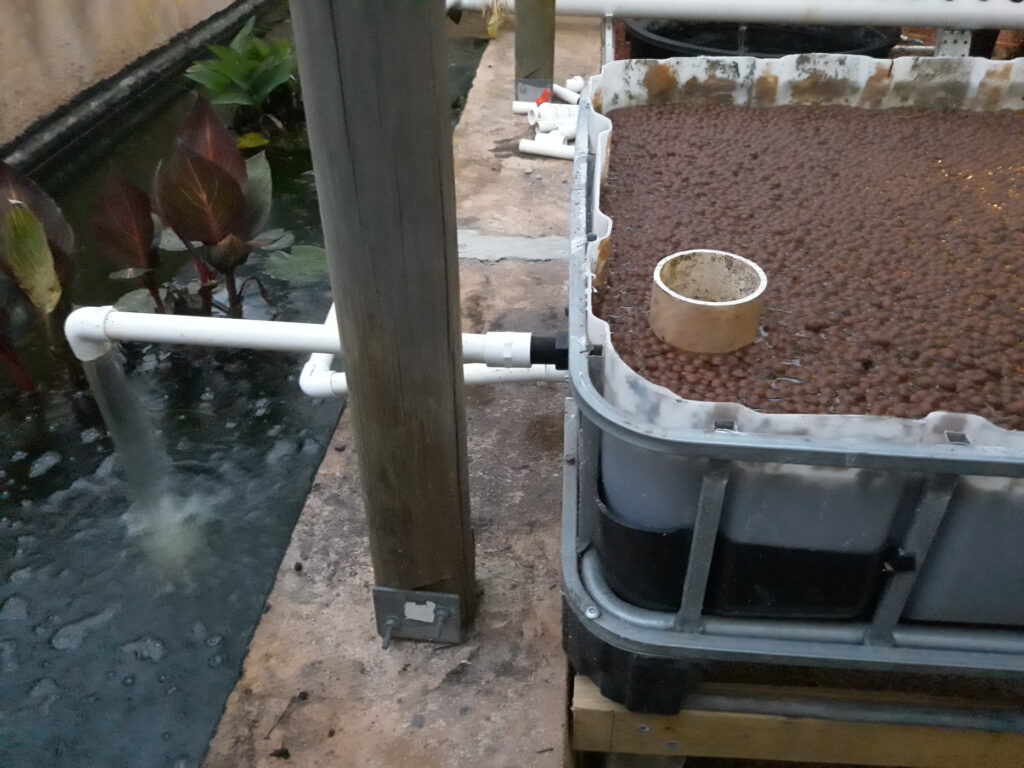
While building the prototype ebb and flow bed for this article, I looked upon all the different sized fittings that I had gone through during my steep learning curve. There were all manner of sizes and shapes. A nightmare to sort and keep supplies of. The World’s Greatest Ebb and Flow Bed has only six standard fittings to work with for all configurations, as shown above. We are going to stay with 1″ (25mm) as a standard. The first fitting is the tank outlet, or also known as a bulkhead. This sets the overflow height for the ebb and flow bed. The pump is going to fill the bed up fairly quickly, and hold it for 15 minutes. That water has to go somewhere, and that somewhere is the overflow outlet. Female and male sockets, also known as valve sockets and faucet sockets, allow your PVC pipe to connect to IBC adapters and bulkheads. 90 degree elbows and plain tees allow your system to infinitely expand and reconfigure.
What Goes In Must Come Out
The IBC tap is how the ebb and flow bed is going to fill with water. A pump in the pond is going to pump water into the bed from the bottom up, to just below the top of your grow media. It’s going to hold that level for 15 minutes, then the pump is going to turn off and drain all the water back out into the pond for 30 minutes. Some people like 15 minutes on, 45 minutes off. In my harsh climate with my harsh summers, I prefer 15 on, 30 off. Your mileage may vary.
What stops the bed from overflowing during that 15 minutes is the tank outlet / bulkhead overflow system, as seen below.
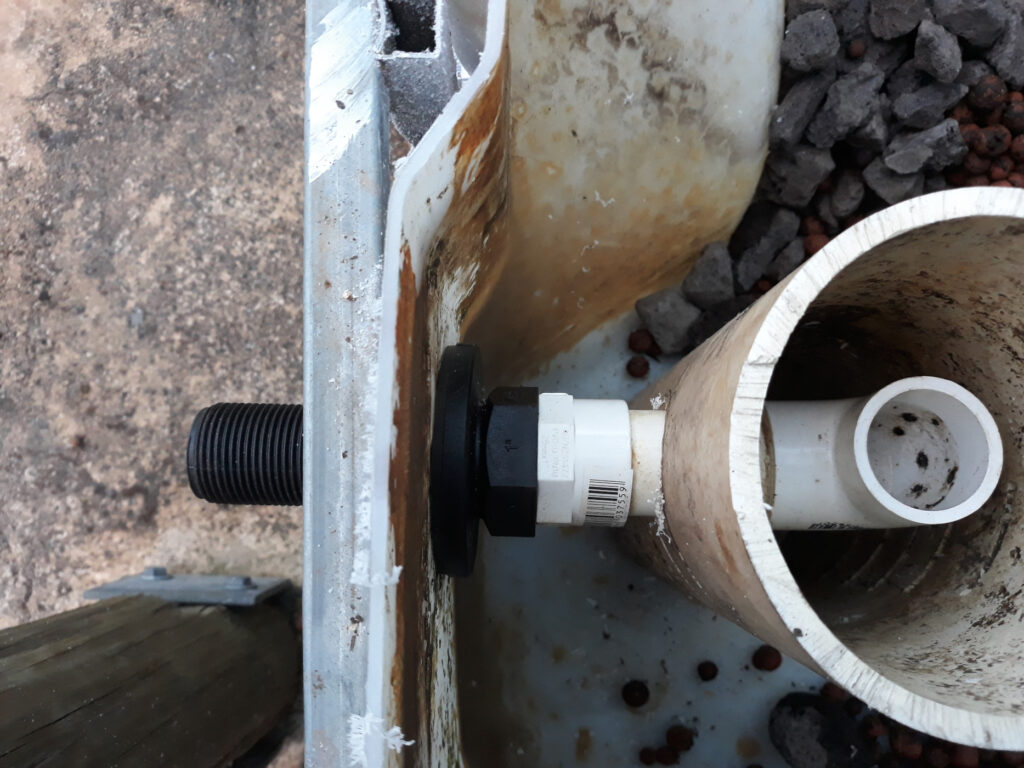
On either side of the large plastic dome containing the IBC valve (you choose which side), you need to find a sufficiently flat part of the IBC wall to drill a hole for the bulkhead. Radial saws for cutting holes in wood are ideal for this. The bulkhead is screwed in male to the outside and female to this inside, as shown. A female PVC socket on the male end and a male PVC socket on the female end allow the appropriate length PVC pipes to be connected.
The height at which you drill the hole for the bulkhead is unimportant, because you’re going to use a 90 degree PVC elbow on the inside to set the height of your overflow, as shown in the overflow pictures above. Simply insert the appropriate length PVC pipe into the top of the elbow to set your overflow at just below the height of the grow media.
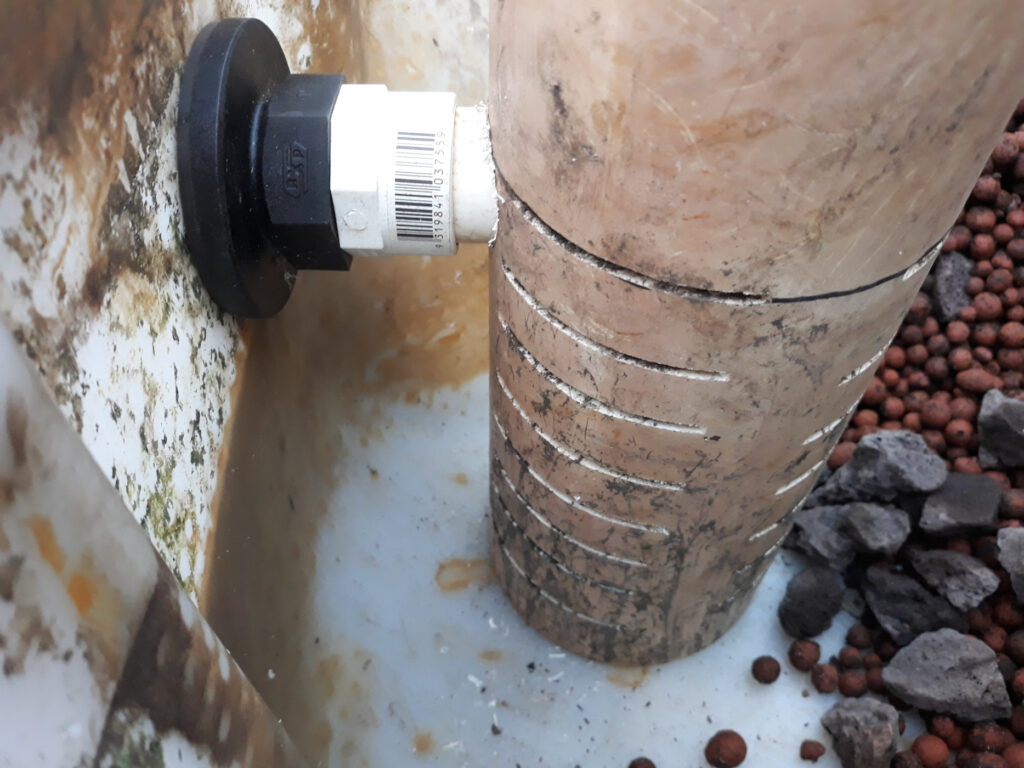
The large PVC conduit that the 90 degree elbow is inside of is a scrap piece of 4″ (100mm) storm drain. I simply must insist that you use a scrap piece of storm drain for this, just out of general principle. The purpose of the 4″ storm drain is to stop grow media from disappearing down the overflow, plant roots from blocking the overflow, and also gives you a clear space to play with the overflow fittings if needed. I’ve also found it to be an easy visual indicator of whether the system is filling, draining, or empty. Use a drop saw (also a common item on any self-respecting homestead. If you don’t have a drop saw, immediately go out and buy a used one and pretend you’ve always had it) to cut a lot of slots through the conduit. This is where the water will enter the conduit to begin overflowing. Yes, plant roots will inevitably make their way through the slots and begin to interfere with water entering. Regular inspections while harvesting lunch will allow you to spot this before it becomes a problem, and just sheer the roots off with a knifer or scraper.
Just as the height of the hole for the bulkhead is unimportant, the distance of the conduit from the wall of the IBC is also unimportant. You’ll notice that mine is quite close, with a very short piece of PVC pipe. There is nothing to stop you using a longer piece of PVC pipe to locate the conduit at the other end of the IBC. Find what works for you.
On the outside end of the bulkhead, insert a long enough length of PVC pipe to return the water back to the pond.
The Aquaponics Grow Media
You’ll notice that a big facet of my World’s Greatest Ebb and Flow Bed has been low cost, repurposing where possible. Scrap wood for the stand, and old IBC for the grow bed. Media is where this philosophy takes a turn. Lava rock and expanded clay balls (leca) are not cheap. And have no cheap alternatives. But the plus side is that you will never replace them, only add to them. They are quite literally rocks, and will last as long as rocks last.
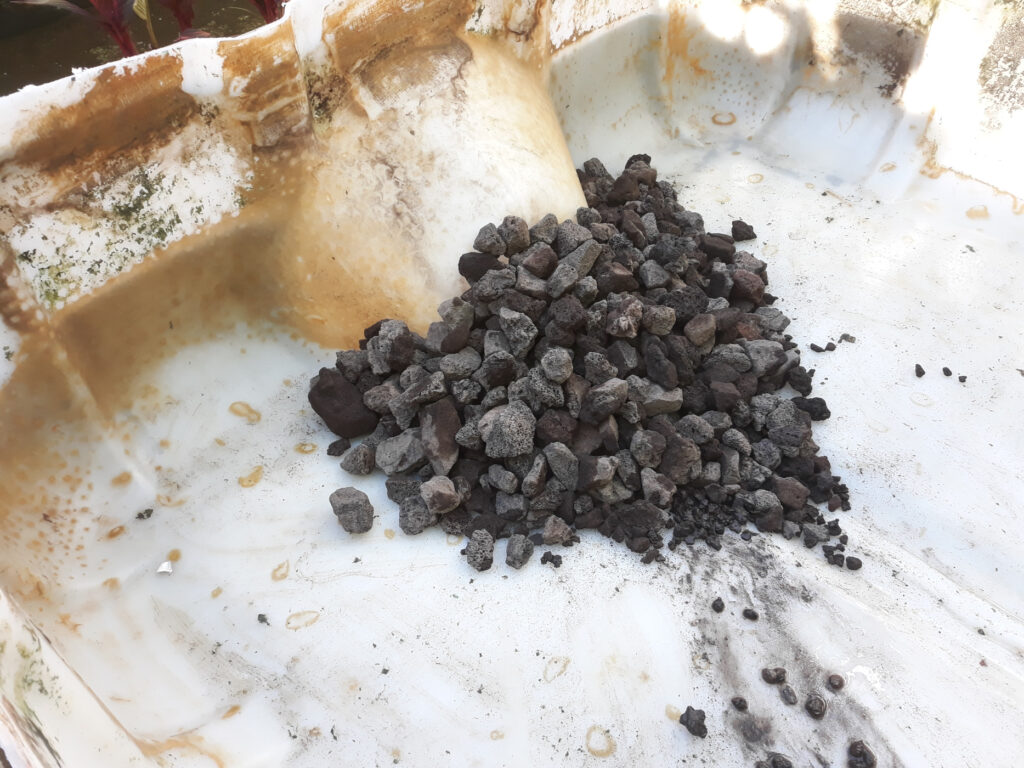
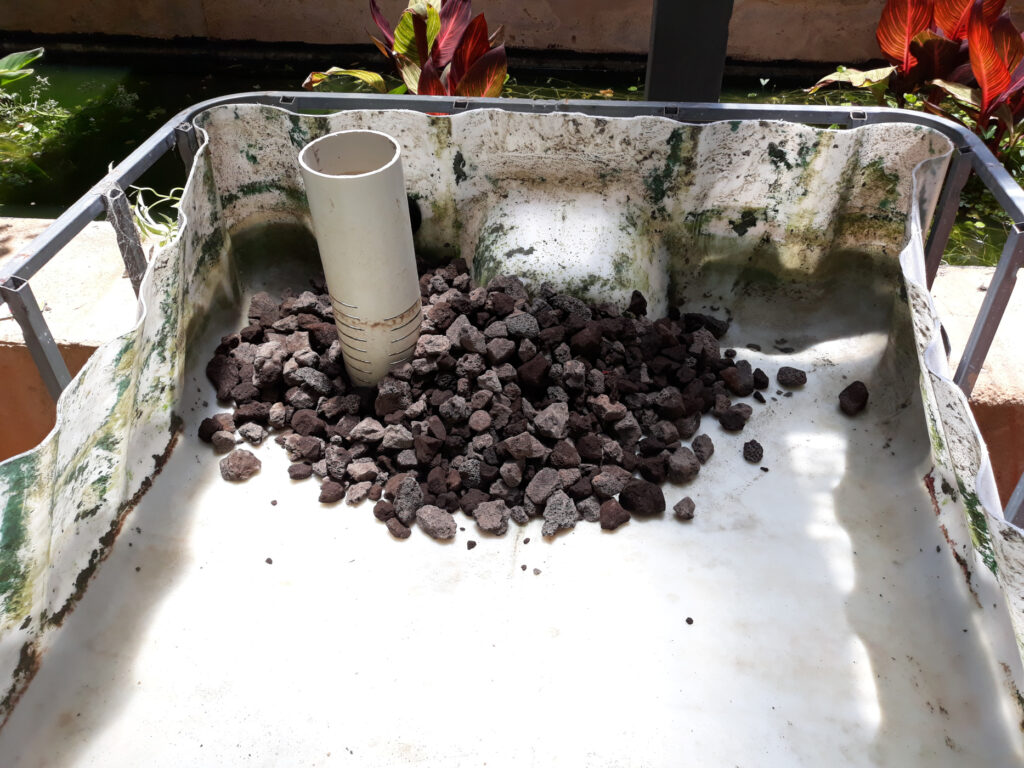
The purpose of the lava rock is two-fold. The inlet for the IBC is 2″ or 50mm. Expanded clay will pour out of that inlet and into the pipe leading from the pump, blocking it. So we pile lava rock around the inlet thick enough so that expanded clay won’t get through. The other place I use lava rock is around the overflow conduit. This is to stabilise it from movement during the constant ebbing and flowing, and to slow the roots down on the their relentless journey towards the overflow pipe.
The relative cost of lava rock versus expanded clay may also determine how much of each you use. If lava rock is cheaper for you, it may be useful to fill the bottom half of the bed with lava rock, and the top half with the more expensive expanded clay. For me, lava rock is more expensive so I use just enough to block the inlet and stabilise the conduit, then the rest is expanded clay. Fill the bed to comfortably below the lip. Now is the time to measure how long vertical PVC pipe needs to be in the overflow conduit to allow water to rise just below the top of the grow media before overflowing back to the pond.
The reason lava rock and expanded clay are used in the ebb and flow in the first place is because they are both composed of millions of tiny air pockets that also absorb water. These give plants a ridiculous amount of oxygen in direct contact with the roots, as well as keeping the roots totally moist during the 30 or 45 minute ebb cycle. When the bed is draining back into the pond, it is also returning super-oxygenated water to the fish.
So What About The Pump?
Any fountain or water feature pump will be fine. You want it to be able to fill the bed(s) in less than 15 minutes, obviously, so you’ll need to do your own research here. And the more beds you add, the more water you’ll need to fill in that 15 minutes. One pump will be filling all the beds at once, so you may find that you’ll be upgrading your pump once you start adding more beds.
A mechanical timer is what turns the pump on and off. Buy the one that has pins that represent 15 minute segments in a circle comprising 24 hours. Press every 3rd pin down for 15 on / 30 off. Press every 4th pin down for 15 on / 45 off.
Remember that this pump is in addition to, not instead of your pond’s existing circulation pump. You still want the water to be circulating during the ebb cycle.
Success and Beyond
The picture above shows my prototype bed full planted out with beans, lettuce, capsicum, and elderberry cuttings. I have found ebb and flow beds to be amazing for producing roots on cuttings. The huge amounts of oxygen available to the the nodes, combined with the constantly moist environment of the expanded clay, seem to be perfect for this purpose.
If you’ve reached this stage, congratulations. You’ve made your first ebb and flow bed for the fraction of the cost of a purpose built one from the store. The first thing you’re going to find is that it’s not nearly big enough for what you want to plant in there. This is where the amazing modularity of the World’s Greatest Ebb and Flow bed comes to the fore.
All you need to do now is repeat exactly what you just did.
What If I Don’t Have A Pond or I Am Doing It Inside?
Remember my first attempt at an aquaponics system? The fish died of ammonia poisoning in the too-small tub. The smaller the volume of water that the fish live in, the more unstable the chemistry of the water will be. Nitrate and ammonia levels can spike in a single day, killing your fish. By definition, inside suggests limited space. You’re simply not putting a 5000 litre aquaponics tub “inside”.
Fortunately there is a simple solution for those without access to a large pond, or who willfully choose to live in climates where ponds freeze over winter—lose the fish. Aquaponics without fish is simply hydroponics. And the hydroponics industry has a solid history of development and innovation, thanks in no small part to the illegal marijuana trade. In recent years, rack-based systems of grow beds with powerful yet efficient LED grow lights have enabled impressive amounts of food to be grown in a footprint no larger than a wardrobe. Small-scale ebb and flow beds can be made using the same mechanical timer as for IBC ebb and flow beds.
Instead of fish, you have a small tub of nutrient solution. Hydroponics stores will have the best advice on what nutrient solutions are best for you.

Copyright 2022 – used by permission.
*Shudra Way is a scofflaw agorist building an Ark on 10 acres of bushland in Western Australia, to weather the upcoming Dim Age. Along with his soulmate, Shudrette, he practices permaculture, aquaponics, and homesteading techniques, as well as constantly testing Death’s patience cutting IBC cages to size.
His website is TheShudraWay.com.
Follow his antics on Twitter/X at @theshudraway or Shudra on Youtube
This article is cross posted from ThrivingNews.com – Thriving Community news, without the Noise.


Check out the NEW 2024 Homesteading Bundle from Permies, which has 35 e-books, courses, videos.
What I really liked:
- The Backyard Forest Garden e-book
- Agroforestry
- Restoration Agriculture: Designing Your Perennial Farm presentation from Permaculture Voices by Mark Shepard
- Permaculture Thorns, A Book About Trying to Build Permaculture Community, by Paul Wheaton.
- Plus 2 books by Nicole Sauce.